How to Use Completion Branches to Pay Participants Fairly on Connect

Key Takeaways:
- A Completion Branch is just a second (or third, or fourth) finish line for your survey, with its own payment attached.
- The most common reason to use one: screening for something Connect’s targeting can’t cover, while still paying the people who don’t qualify.
- Setting one up requires two steps, in two different places — a branch in Connect, and matching branching logic in your survey. Missing the second step is the most common mistake.
- If your screening criteria stack up into something very narrow, Managed Research will likely serve you better than in-survey screening.
Video TranscriptCharles Jamerlan · Recorded May 2025
IntroductionWalkthrough0:01
Welcome, all, and thank you for joining today’s webinar. First, an introduction: I’m Charles Jamerlan, and I am the Product Lead of Connect, the flagship participant recruitment platform that we here at CloudResearch have created.
In addition to the incredible data quality that we all know Connect provides, our daily mission is to improve, to iterate, and to deliver features that we hope bring you — our beloved users — tremendous value. Today, we’re going to be doing a deep dive into one of Connect’s many features, titled Branches. So let’s go unlock the power of Branches.
Why Branches?Walkthrough0:46
As a researcher, are you looking to target niche populations but having a hard time finding them? Say you’re looking for left-handed avocado eaters, or outer space fanatics who own black cats — a little extreme, but who knows? Maybe you’re looking to recruit them for your survey or project.
Maybe you’re looking to recruit two or more groups of participants with different paths or journeys in your survey. Although the outcome at the end of the survey may be the same in terms of compensation and content, perhaps each group within your project answers a different set of questions, and you want to easily identify which participants belong to which groups.
Or say you’re looking to use complex and unique screening in your survey. Maybe your survey requires a combination of demographic targeting, specific combinations of questions and answers, specific attention checks, etc. — and each of the various outcomes and permutations of these different scenarios requires a different compensation value for the participants taking that experience.
If the answer is yes to any of these, then Connect Branches is absolutely for you. You have participants who you don’t want passing Go and collecting $200 — maybe you want to pay them a dollar or two. Of course, you have some participants who don’t meet the criteria you’re looking for in your project. And then you have the winners — those who you want to continue and give you the data that you need.
The three action typesWalkthrough2:37
In essence, Connect Branches allows you to create multiple custom completion settings for your project. We have three different action types for our branches:
Manual Review — allows you to reject or approve the submission for the full compensation amount.
Automatic Approval — allows the submission to be approved immediately for the full compensation amount.
These two action types are meant to be used for the full end-of-survey experience.
Partial Completion — last but certainly not least, and probably the main use case of Branches. This is a way for you to create screen-outs with partial compensation, up to the full completion payment amount, for your survey.
Getting to Completion SettingsLive demo3:36
At this point, let’s jump right into a live demo. This demo will assume previous experience using Connect — such as setting up and managing a project — as we’re going to focus solely on the functionality of Branches.
Here is the dashboard for Connect. As you can see, I’ve already created a project for us to use in this demo, called “Wearable Devices.” We’re going to go to the Edit Project screen. I’ve already pre-filled all the required fields, such as the designated targets — we want 100 participants for this project — how much I’m paying them, and so on.
As you scroll all the way down, we get to the Completion Settings, where we find the ability to add branches. By default, a Connect project will create one Manual Review branch as a way to close the loop, so to speak. Connect participants start on Connect, go to your survey (wherever that’s hosted), and then come back to Connect using this redirect URL or completion code. That’s how we know they started and ended in Connect.
Adding a Manual Review branchLive demo5:00
To add a branch, all we need to do is click on the Add Branch button, and we get this popup. First and foremost, we want to add a label to the branch — something descriptive to help us remember or identify exactly what we’re trying to accomplish with this specific branch. Let’s create one of each type. I’ll call this “Test Group B” (our default one will be “Test Group A”).
We’re going to choose the Manual Review submission branch type. Again, this gives you the ability to review your submission — I believe you have 14 days to approve or reject it — and pay the participant the full completion compensation amount at the end of the survey.
Here we have our set of completion settings: the redirect URL and the code. If you notice, the code is exactly what you’d find in the URL — it’s just a different mechanism in case you’re not able to plug a URL into the platform you’re using to run your survey. You can always show the participant the code, and they can manually submit it through Connect.
Let’s hit Save. Now we’ve got our two branches on our project. We can also rename the default one that was created — let’s rename it to “Test Group A.” Save. Now we have our two full-completion branches: Test Group A and Test Group B. We have these two URLs we’ve created, and we’re now able to identify which participant came through which URL, and see which group they belong to.
Adding an Auto-Approve branchLive demo6:38
Let’s create another branch — this one for the Approve and Pay type. Let’s call it “Test Group C — Auto Approve,” and select Approve and Pay. Just as I mentioned earlier, the Approve and Pay action type is an immediate approval. If you don’t care to review the data that comes through for a submission and you just want to pay the participant right away, you can use this action type.
Here we have the ability to add an optional message that the participant will receive via notification once they’ve submitted through this URL. I’ll say, “Thanks for your participation — payment on the way,” because they’re going to be auto-approved.
Let’s hit Save. Now we’ve got our third branch, with its own redirect URL and completion code, plus a way for you to verify the values you set — we show you the message here, as well as a general reminder of what it means to auto-approve using this URL.
Adding a Partial Complete branchLive demo7:57
Let’s go ahead and create the last action type: Partial Complete. This sample project I created is called “Wearable Devices,” so let’s say we’re targeting users who wear Apple Watches. We want to add a screener up front in our project that asks whether you wear an Apple Watch or not. So we can create a Partial Completion branch that redirects non–Apple Watch users. Let’s call it “Non–Apple Watch Users” and choose the Partial Complete setting.
You’ll see it opens up a new set of values we need to fill in. In this case, the message is absolutely required — we do need to fill something in for the participants. Let’s say, “I’m sorry, you are not eligible” — because we want to screen them out, but pay them.
Next, the estimated time in minutes. This is where you’ll want to figure out where this question will be placed in your survey and how long it would take to get to that point. Typically, screeners are closer to the front, so the amount of time would be a lot smaller. Currently, the minimum value we have is 2 minutes, but that’s something we may adjust to something smaller in the future. Let’s put 2 minutes.
For the payment, we’re going to put 25 cents, as it has to adhere to our pay-per-hour criteria, which is a $7.50-an-hour hard minimum and a recommended minimum of $10 an hour. If we were to modify the estimated time in minutes, this payment minimum would also adjust accordingly. So this is how much you’d be paying participants who came through this particular branch URL.
Now, Max Partial Submissions is an important value. Since everything in Connect is prepaid, we need to identify the maximum number of partials we’re going to prepay for. We can’t set it to an unlimited amount, or an infinite amount of funds could be withdrawn from your account. For this one, let’s set a value of 200. Once this maximum partial submission number gets reached, your project will pause automatically, and you’ll get notified so you know you’ll need to either add more partials to continue your project, or end it right there and review your data. This is a way to control your spending and make sure you’re not overspending on this kind of project.
Let’s hit Save. And there we go — we have our final branch, with its set of redirect URL and code, and all the various values we’ve set, ready for review.
The cost calculatorLive demo10:53
If you notice on the right-hand side, we have our cost calculator. Any time you use a Partial Complete, we’ll let you know that any unused submissions and fees will be refunded upon completion. In this case, we set 200 for the number of partials, but we may not hit that — everyone that comes through on this project may be eligible (they may all be Apple Watch users). Let’s say only 10 get routed out — we’ll refund you automatically for the 190 once the project is completed and closed. You can also expand this to see exactly how the costs break down between the full submission URLs and the partials.
Let’s save changes and go back to our dashboard. Our project has been updated, and we now have a “Multiple Approval Types” label, which you can hover over to see all the various branch types you’ve created.
Monitoring a live project with partialsLive demo11:50
Down here I have another project that’s already live and has multiple approval types — this one has a Manual Review and a Partial Complete. You can see exactly how this kind of project looks once it’s in the wild: you can see the number of partials that have come through — 135 for this project — and so on.
Let’s hit Manage so we can see further statistics and metrics for this project, and I’ll show you how you’re going to monitor a project with partials. Any of the non-partial branch types — Auto Approve and Manual Review — will get counted toward the full sample target. Anything that comes through those two URLs will be reflected in the Pending, Approved, or Rejected values here. Anything that comes through the Partial Complete branches will be reflected in this new metric for the number of partial completes, as we saw on the dashboard.
There are some other metrics here — completion and bounce rates, duration times — but what I want to highlight is that for any partial you’ve created, you’ll see a breakdown of how many have come through, as well as the total. Here, we had 2,050 max partial submissions, and 135 came through. There are additional metrics on how much you paid, and how much you prepaid for that particular branch.
Down in the Manage Participants section, you can see that all the partial completes are easily identified in blue with the Partial Complete status, so you can easily figure out which participants came through your partial completes. For every one of the various action types, we generate a new completion code, so you can easily filter and see which participants came through which URL. This will help you identify your various groups if you’re running multiple test groups — just choose a code, hit Filter, and it will automatically filter those participants. It’s a very easy way to manage your data. This data — the status and the completion code — is also available when you download your CSV for processing.
Adding more partials mid-studyLive demo14:13
Lastly, I want to show how to add partials. Once the project is live with multiple approval types, the option to add partials is shown here. You don’t have to wait until the maximum value is reached — you can do it at any time while the project is live. Say you’re monitoring your project and you don’t want the flow of recruitment to slow down or stop because it would pause as this number gets closer to the max. You can increase this count at any given time. Here, let’s add 100 more — we’ll show you exactly how much you’re going to pay for those additional partials. Click Add, your balance will get updated, and the number of partials has now been increased to 2,150.
Implementation notesWalkthrough14:58
A couple of implementation notes I wanted to highlight: Connect Branches works with any third-party platform that has decision logic — whether it’s SurveyMonkey, Qualtrics, or anything else. Any time you can build a workflow or decision logic and the platform supports URLs, you can plug those URLs into the survey and redirect back to Connect accordingly.
Also, as I’ve shown you, you can execute branches via redirects (the default method) or via completion codes. Maybe you’re using a platform that doesn’t support redirects — just provide the custom completion code for that specific branch and have your participants come back to Connect and manually plug it in.
Do I need a separate end-of-survey block for partials?Asked live by an attendeeQ&A16:02
Attendee: I have a question about the Partial Complete. When we branch people into Partial Complete, do I need to create another survey on Qualtrics, or how does that happen? For example, usually what I would do is create a survey on Qualtrics, have the screener question up front, and if the person says no on the screener question, end the survey for them then and there. So does the Partial Complete automatically detect that the person did not complete the screener?
Charles: That’s a good question — thank you. So with Connect, the one thing we don’t allow as part of our terms is non-compensated termination, like screeners. Everyone who participates on Connect has to be compensated in some form or fashion — that’s why we created the Partial Complete branch. On Qualtrics, you could ask that screener question, but you would have to create another End of Survey block, where you plug in logic like: if the participant answers “yes” to this question, send them to this block. In that block, you would show them your termination message and have it redirect back to Connect with that Partial Completion branch URL. That way, they’ll be compensated for the time they’ve taken on your project. Does that answer your question?
Attendee: Let me restate it to see if I actually understood. Let’s say in Qualtrics I set up the branch so that a person who says no on the screener survey ends the survey there. In the End of Survey block, I just put in the Partial Complete redirect link. Connect would then automatically detect them as partial.
Charles: Absolutely. Yep.
Attendee: Okay, perfect. Thank you so much.
Is the minimum time for partial completes two minutes?Asked in the chatQ&A18:14
Moderator: There are some questions in the chat, Charles. I can read them off to you. One of them is: is the minimum time for partial completes two minutes?
Charles: Thank you. Yes, currently it is two minutes. We’ve had Branches out for some time now, and we’re analyzing what makes sense here — so we may be reducing that down to about a minute in the near future. To answer your question, as it currently stands, it’s two minutes. One of the reasons we didn’t want to make that number too small initially was that we wanted to make sure it was used properly and wasn’t just a way to take advantage of the system, so to speak. But yes — currently the answer is two minutes, and at some point that will probably change to something smaller.
What happens if you exceed the maximum partials?Asked in the chatQ&A19:12
Moderator: From David: you may have gone over this, but what happens if you exceed the maximum number of partial completes?
Charles: Yes — when the maximum number of partial completes gets reached, your project will automatically be put in a paused status. You, as the project owner, will get notified that your project has paused due to the maximum number of partials being reached, and asked to go back into the platform and add more partials to continue your project. That’s exactly what happens there.
Participants confused by an early screen-outAsked in the chatQ&A19:47
I see a comment here as well: “Many participants got screened out after one question, got confused, and rated my survey one star — even though they got paid.”
Yes — the feedback system is something that we’re actually looking to revamp a little bit because of the partials. We do understand that sometimes participants aren’t all too happy with some of the compensation amounts they receive, even with the Partial Completion settings in place. That’s something we may be tweaking as well — how we weigh certain types of feedback that come through the system.
What if you don't want to pay for a failed attention check?Asked in the chatQ&A20:29
Moderator: I have something that might be good to go over: cases where researchers might not want to pay for failed attention checks. I know you mentioned at the beginning that you can pay if there’s a failed attention check, but sometimes that’s not always the case, and we obviously don’t want somebody paying for a low-quality participant. What would you recommend they set up in that case?
Charles: It’s always been a tricky scenario, as we’ve experienced in the past. Typically with attention checks, the researcher has every right to reject the participant if it’s an indication of quality that isn’t satisfactory. What I alluded to at the beginning about unique and complex screening applies here: it may be attention checks plus other permutations or combinations, where it’s not just the single metric of an attention check that determines whether you reject or approve a participant. The data might come through, the attention check may have been failed for whatever reason, but the data quality was actually pretty good — and you had other variables you’re scoring the participant on.
That’s where having a Partial branch would help, because you can set a compensation value that’s not quite the full amount. You don’t necessarily want to reject the participant and not compensate them at all. We also have the ability to Reject and Pay, where you can reject the participant and pay them some kind of bonus. But every rejection affects the quality score for that participant — and we have this community of participants and researchers who are fair to each other. Setting up the Partial Complete won’t ding the participant’s score as much as a full rejection would, if at all, and it still allows you to compensate them a small amount.
In summary, I’d say it’s the attention check plus other permutations and variables in your study that you’re weighing when deciding whether to reject a participant. That’s something we’re going to measure over time as we see usage of Connect Branches, to see how we can add clarification or a solution to this kind of scenario, which we do see come up from time to time.
Do you have to pay when someone fails an eligibility question?Asked in the chatQ&A23:09
I see another question here from Jay: do we have to pay even when a participant fails the eligibility question and is blocked?
Any time you’re running a project on Connect and you put some kind of screener or eligibility question in your project — say on Qualtrics — you do have to pay them. That’s part of our terms: you have to compensate people for the time they’ve taken on the project. Now, that’s separate from a hard rejection. A hard rejection is when they’ve given you data and it’s just not what you’re looking for — there’s no true eligibility or screener aspect to that part of your survey. So yes, you do have to pay them.
Now, when you say “blocked,” I’m not quite sure what you mean — but in our system, there are people who may be identified as low quality at some point on Connect, and we block them. Anyone who is blocked, you wouldn’t have to compensate, because they’re out of the system at that point. But for anyone you’re looking to screen — say, through an eligibility question in your project — you would have to compensate them via the Partial Complete branch.
Ah, okay — yes, a screening question at the front of the survey. If you’re running it through Connect and you’re putting a screening question in your survey, you have to use a Partial Complete branch to compensate participants for the time they’ve taken on your project.
Closing notesWrap-up25:00
If at any time you want to use Branches — especially for niche populations and complex screening — I do want to highlight the niche populations use case. We have demographic targeting on Connect with over 200 qualification questions, and we continually add new questions every week. However, the population you’re looking to target may not be there, you may be in a time crunch, or it may be super niche. So I think Branches is definitely the way to go for screening and finding those particular populations you’re looking to recruit for your project.
We also have a tutorial article on our website’s knowledge base, which covers a lot of the points I went over in today’s webinar, along with a video that goes into detail on setting up your branches for your project. You can access it directly at bit.ly/brancheskb.
I also want to remind you of our promotion for academic and nonprofit researchers: 10 days of no fees from the launch of your first study. If you’re a new user and you’re an academic or nonprofit organization, you can enjoy 10 days of absolutely no additional costs — other than what you’re paying to participants — from the launch of your first study. We understand that IRBs may take time, so go ahead: sign up, create your project, set up all your branches, and take your time. The moment you launch is when the 10 days of no fees start.
If you have any questions, please feel free to reach out to me at charles.jamerlan@cloudresearch.com, as well as our incredible support team at support@cloudresearch.com. I want to personally thank you all for your time today, and I look forward to seeing you all in future webinars.
How Completion Branches Let You Pay for Partial Completes on Connect
One of the great things about online research is its flexibility. As a researcher, it’s easy to recruit people from different demographic groups, ask them to complete different kinds of tasks, and even follow them over time. Within a single study it’s also possible to customize people’s experience so that everyone isn’t completing one study, but variations of the study.
Whenever you want to customize where people end a study—whether because of demographic screening, naturally occurring variation in how many questions you want to ask different groups of respondents, or a study or experiment that rewards people based on their effort and persistence with some task—completion branches are the tool to use.
What Completion Branches Do
A Completion Branch lets you set up a custom endpoint in your study. While people who go from A to Z in your study will receive the standard “fully completed” redirect or completion code, people who go from A to E can receive a different redirect or completion code. The same is true for those who go from A to P.
Grouping participants based on how much time they spent in the study allows researchers to pay each person accordingly. Think of it like this: instead of every participant hitting the same finish line, you can define several different finish lines and pay each one differently, based on how far respondents got in your survey and how much time or effort they spent.
When To Use Completion Branches: Setting More Than One Finish Line
There are many situations in which it makes sense to use completion branches. A few of them are:
- When your survey naturally forks. Imagine a survey that asks people about a medical condition. Some people might have more, and more severe, symptoms than others. If you want people to explain all of their symptoms, you could set up one completion point for people who report few symptoms and another for people who report many.
- When you want to reward effort. Some studies examine whether people are willing to persist in a task, take time to explore information, or engage in an optional behavior like signing a petition. Whenever the extra action takes long enough that people should be compensated for their time, branches make it easy to do so.
- When you need to screen for characteristics Connect can’t target directly. Screening participants is the most common reason to use completion branches. Screening questions allow researchers to ask about any characteristic that is relevant to the study and to sort respondents into qualified and unqualified groups. Unqualified participants exit the study; qualified participants continue to the main part.
To ensure participants don’t spend a lot of time answering screening questions and seldom getting into a study, Connect requires researchers to pay people who do not qualify. The minimum payment in 2026 was 13 cents for one minute of time.
Setting Up a Completion Branch
Setting up a branch requires action in both the survey platform and the participant recruitment platform.
First, in Connect:
- In the Completion Branches section of study setup, select Add Branch.
- Give the branch a clear label — something you’ll recognize later, like “Does Not Qualify.”
- Set Partial Complete as the option, write the message participants will see, and set Est. Time in Mins to roughly how far into the survey this redirect happens.
- Set the payment. It has to meet the site minimum: $0.13 per minute of time. One minute is the minimum payment allowed.
- If you want to cap how many people receive this particular branch, set a Max Partial Submissions limit.
- Save. Connect will give you a redirect URL or code for this branch.
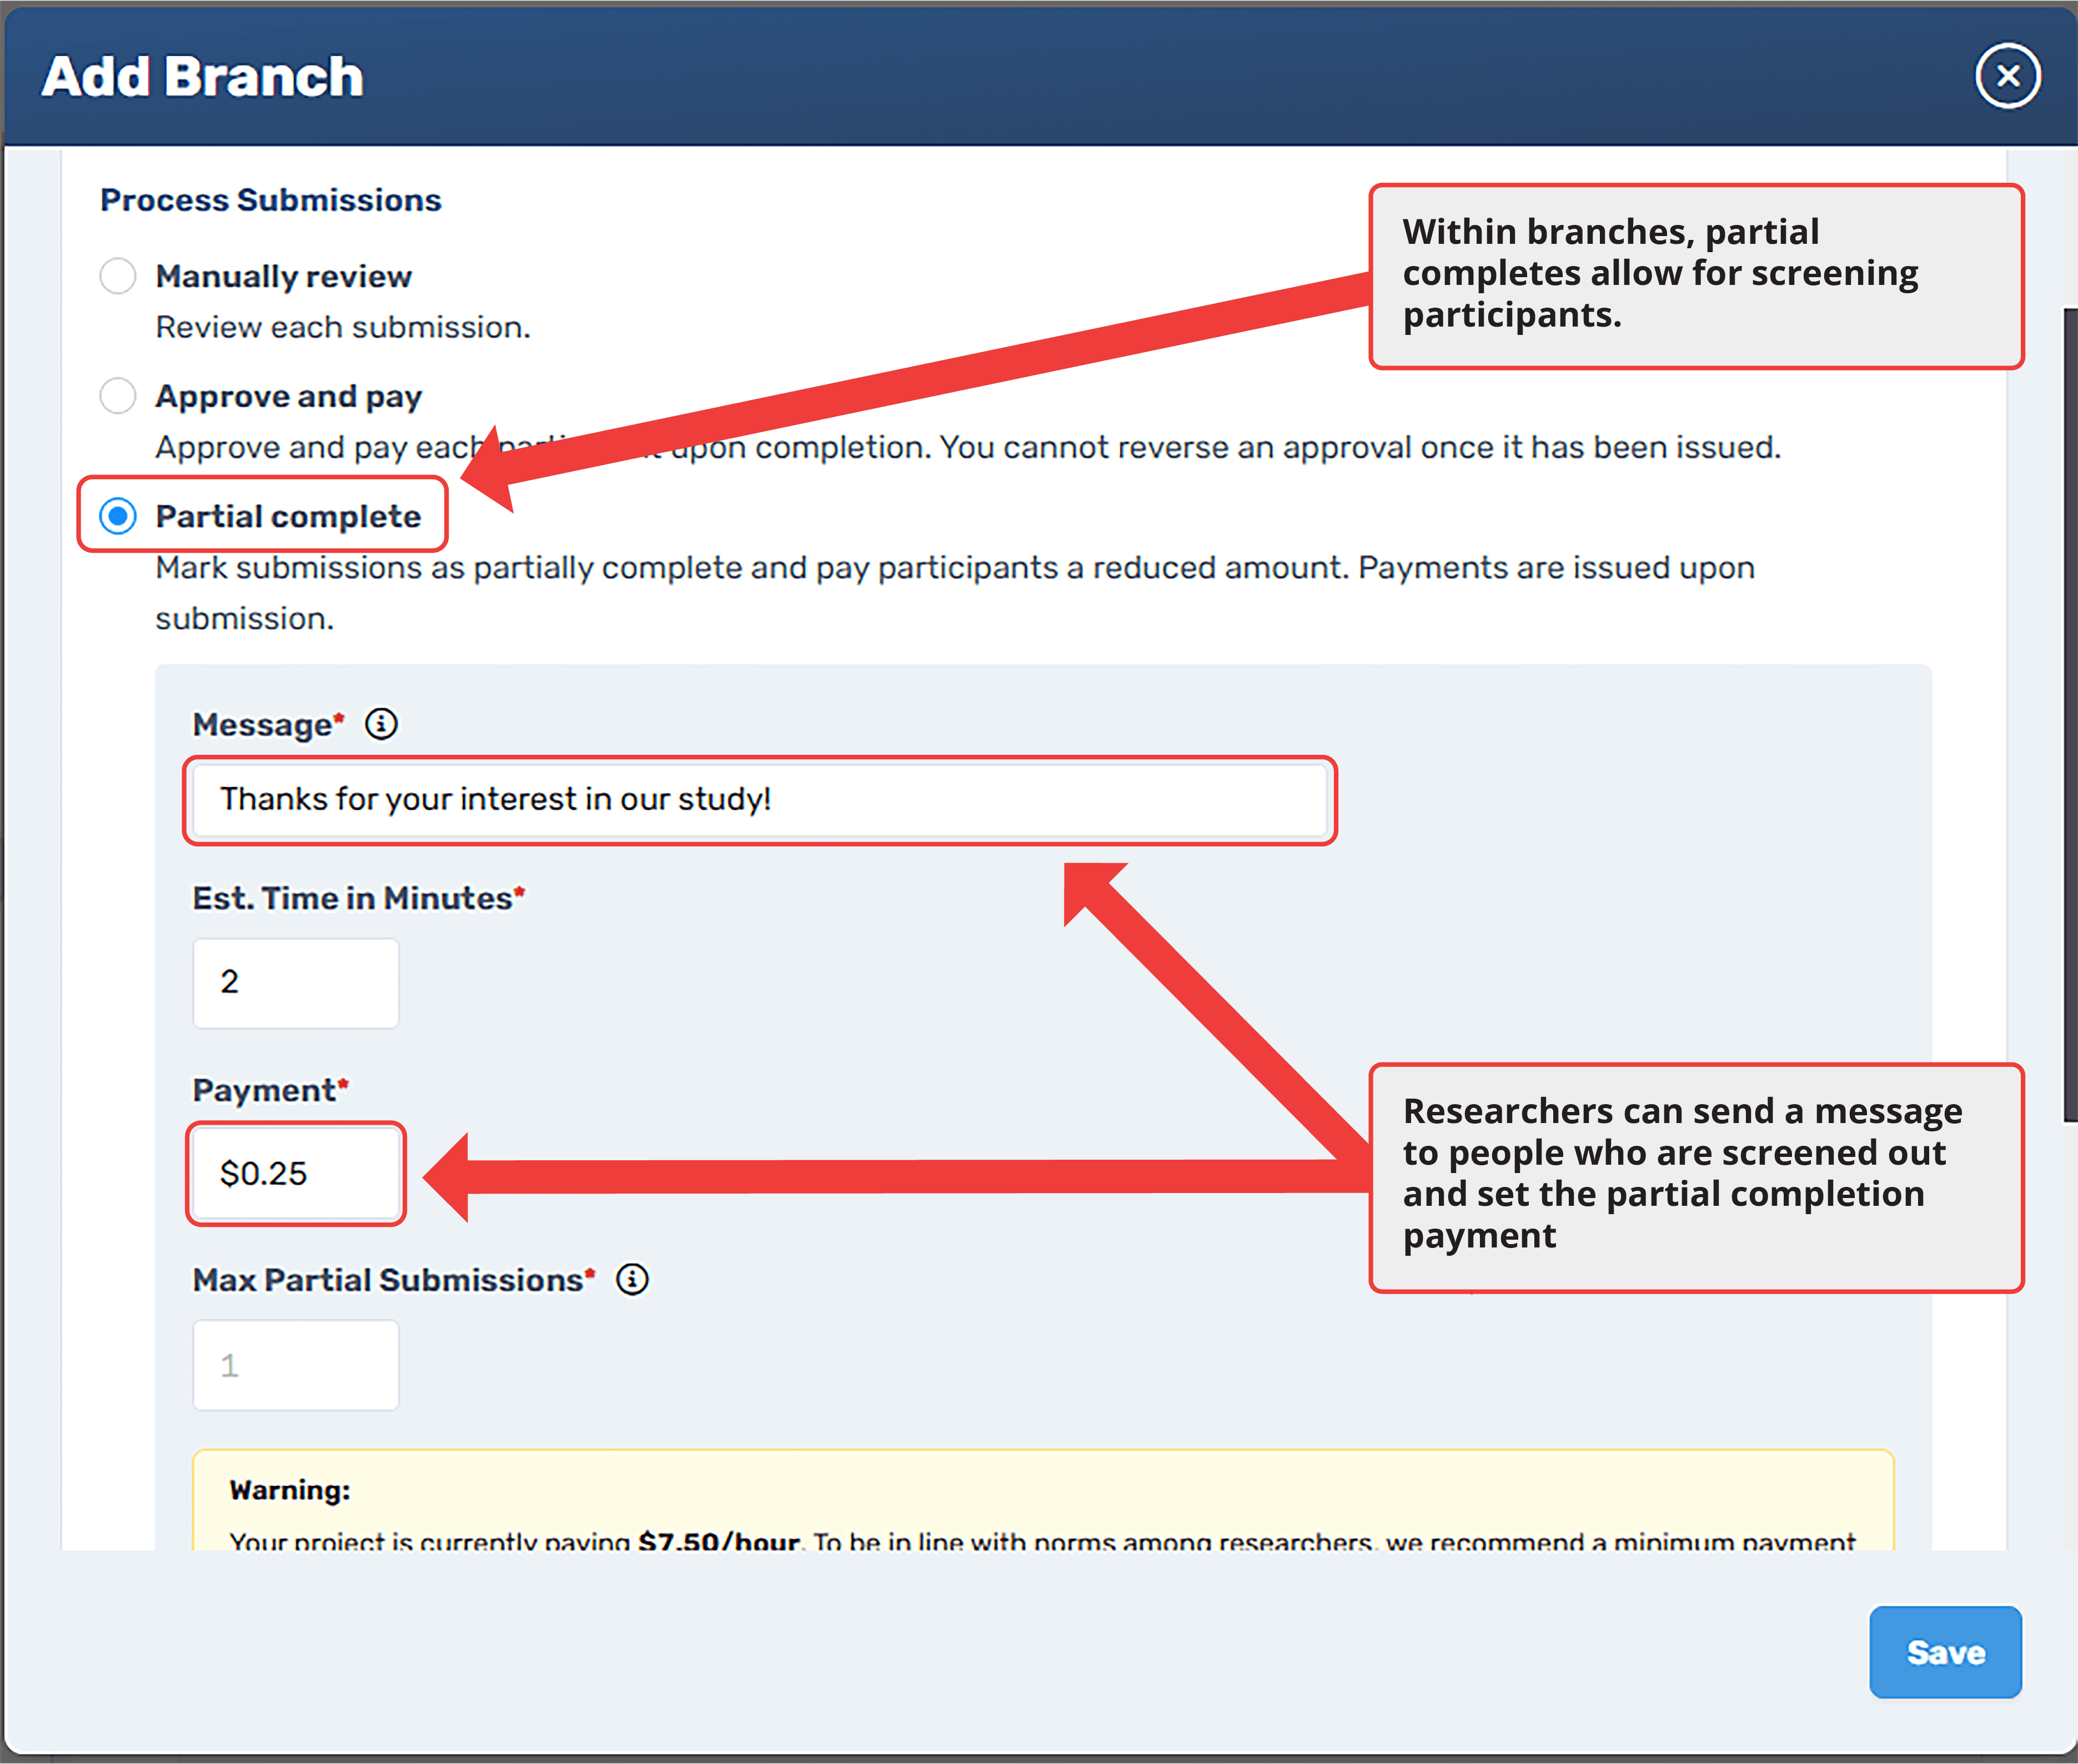
The Add Branch dialog in Connect. Partial complete is the option that pays a reduced amount on submission — the message, estimated time, and payment all belong to this one branch.
Second, in your survey platform. Setting up a branch in Connect only creates the destination. Your survey still needs the logic that actually sends disqualified participants to the redirect you created. Skip this step and Connect has a finish line waiting, but nothing in your survey ever points people toward it. It’s the most common reason a branch doesn’t work.
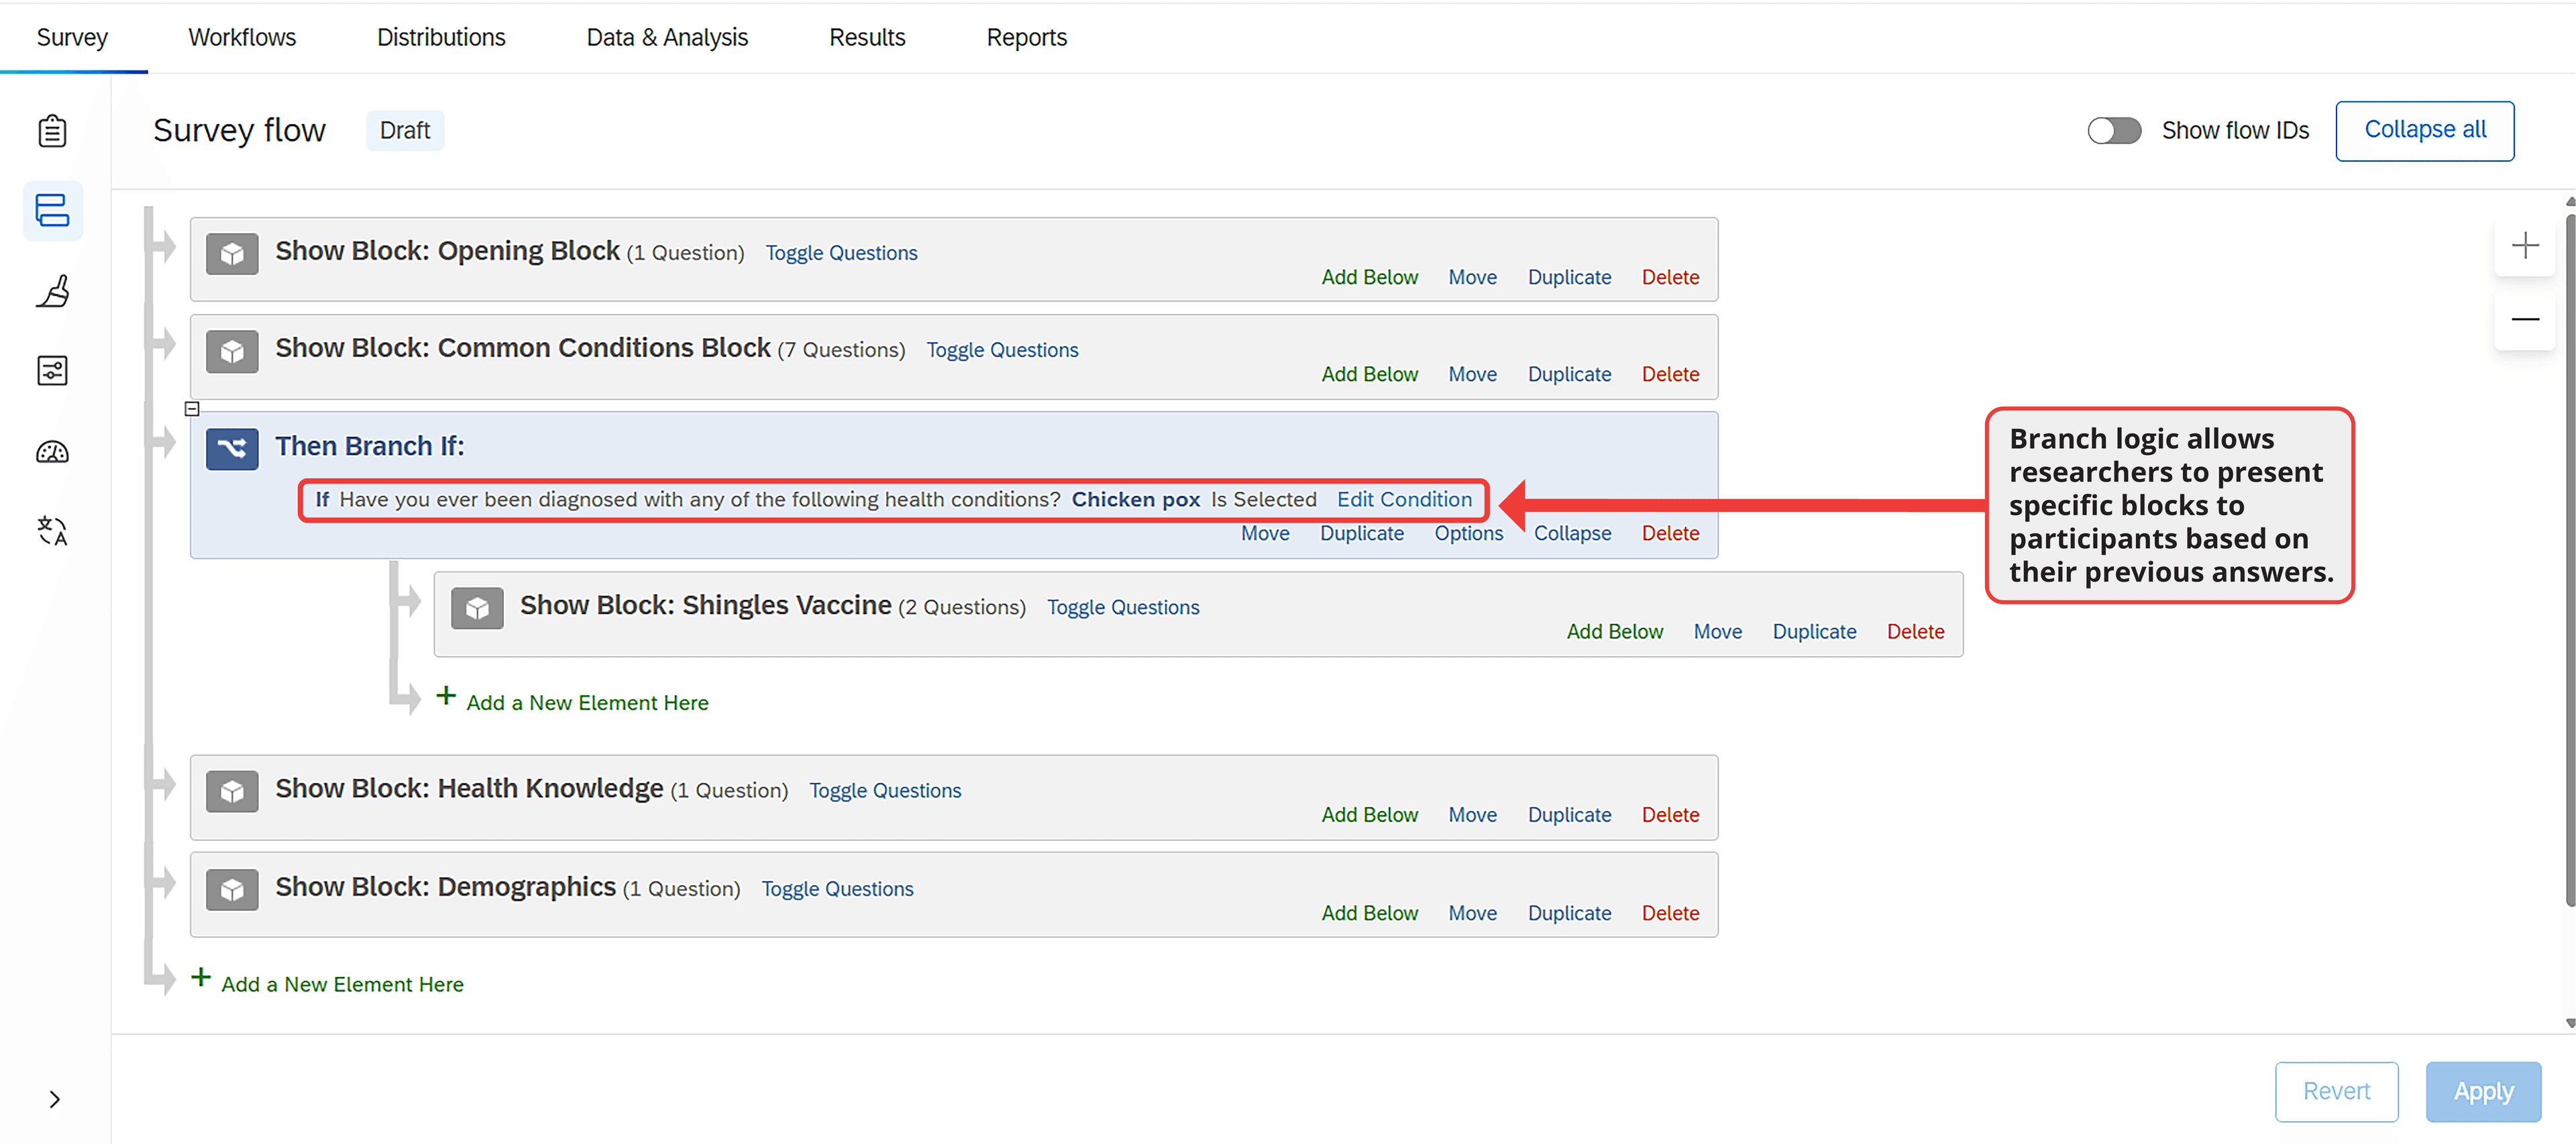
Branch logic in a survey platform. The condition is what decides who reaches the Connect redirect you just created — without it, the branch never fires.
Connect calculates your study’s cost based on the maximum number of partial completions you configure. If fewer people actually land in a branch than you budgeted for, the difference is returned to your account balance once the study ends.
When Branches Aren’t Enough
In-survey screening works well when you are targeting a single trait or a loose combination of traits. But it starts to break down when your target is very specific. If your screening questions start to stack a few rare conditions or characteristics on top of each other, say a specific age range, combined with a rare occupation and a particular health condition, then there is a more direct way to find participants. It’s called Managed Research.
Managed research studies are ones in which our team of project managers help recruit your sample while drawing from a larger pool of online participants.